 01-30-2014, 06:22 PM
|
#196 | |
|
Professional Stick Poker

Join Date: Feb 2011
Location: Stafford, Ks.
Posts: 1,018
Rep Power: 16  |
Quote:

__________________
1988 N/A SE 2+2, dead stock and staying that way.  1979 SA22C stock? Not so much. http://rotarycarclub.com/rotary_foru...ad.php?t=15585 |
|

|
|
02-28-2014, 11:09 PM
|
#197 |
|
Professional Stick Poker
Join Date: Feb 2011
Location: Stafford, Ks.
Posts: 1,018
Rep Power: 16 |
OK. Plan 436. I ran out of letters a ways back and had to start numbering them.
To fix the problem of being at the end of my adjustment range (and still being .2 degrees off in caster side to side). I came up with putting an adjustment rail on top of my existing camber adjustment rail. This necessitated raising the mounting point and opening up some more room to the rear. I'm using stop bolts on both sides of the clamping rails so I hopefully get no movement from my adjusters when under load. This is in addition to the bolts that clamp it all together. I have been a little concerned to make doubly sure I get no movement once I get the @#$%^ thing adjusted to the correct spot. The bottom cradle will also be able to move forward and back using a bolt and stop nuts on the bracket at the front of the lower rail. The clamping bolts on the lower rail will be slotted. It SHOULD fix my adjustability problems. I need to weld in a plate to close up the top of the mount with the upper hoop and put some gusseting across it so that the mount is rock steady. Not the most elegant solution, but I will have full fine adjustability to dial it in, as well as the ability to make large adjustments when I decide to do something stupid. Such as playing with my wheelbase. Me actually getting the car to DGRR is starting to look pretty iffy, since things are refusing to cooperate. Regardless of whether the little (insert Peter's favorite word here) gets there or not, I plan to be there this year.  plan 436 by GySgtFrank, on Flickr
__________________
1988 N/A SE 2+2, dead stock and staying that way. 1979 SA22C stock? Not so much. http://rotarycarclub.com/rotary_foru...ad.php?t=15585 |
|
|
|
03-01-2014, 01:11 AM
|
#198 |
|
Test Whore - Admin

Join Date: Mar 2008
Location: Right Behind you son
Posts: 4,581
Rep Power: 10 |
Hey Gunny.... one more night of insomnia, although I'm happy to see you're making progress. Such an undertaking man.... it's looking really REALLY sick.... something I've never seen done before to that extent on a little first gen... can't wait to see it done.
__________________
-The Angry Stig- DGRR 2009, 2011, 2012 & 2013 - Best FC DEALS GAP!! WOOHOOOO!!!!! 2015 Audi S4 - Samantha - Zero Brap S4 2004 RX8 - Jocelyn - 196rwhp, 19mpg fuel to noise converter 2000 Jeep Cherokee Sport - Wifey mobile - Now with 2.5" OME lift and 30" BFG AT KO's! So it begins 1998 Jeep Cherokee - 5 spd, 4" lift, 33" BFG's - Rotary Tow Vehicle 1988 'Vert - In progress 1988 FC Coupe - Gretchen -The attention whore BEAST! I'm a sick individual, what's wrong with you? I'm pure Evil I'm still insane, in the best possible way. I think Brian's idea of romance is using lube. Your rage caused the meteor strike in Russia. The Antichrist would be proud of his minion. You win with your thread. Most everything It's a truck with a steel gate on the back. Just a statement of fact Motec M820, AIM dash, ported 13B-RE Cosmo, 6-spd trans, 4.3 Torsen, custom twin wg fully divided mani, Custom 4" split into 2x 3" exhaust, Custom HMIC, Custom custom custom custom I like to welder stuff.... No Bolt-ons allowed. Dyno'ed @ Speed1 Tuned by me - 405rwhp on WG.... WM50 cuming soon. -Angry Motherf*cker Mode ENGAGED- |
|
|
|
03-01-2014, 02:23 AM
|
#199 | |
|
Professional Stick Poker
Join Date: Feb 2011
Location: Stafford, Ks.
Posts: 1,018
Rep Power: 16 |
Quote:
I figure if I can stuff enough tire under there and get the settings right I can save on brake pad replacements, 'cuz we just won't brake fur no stoopid corners. I'll have brakes too though, just for those damn suicidal deer. Passenger seatbelts will be a requirement so I don't lose anybody. Windshields are expensive. 
__________________
1988 N/A SE 2+2, dead stock and staying that way. 1979 SA22C stock? Not so much. http://rotarycarclub.com/rotary_foru...ad.php?t=15585 |
|
|
|
|
03-01-2014, 09:35 AM
|
#200 | ||||
|
Get off my lawn!!!
Join Date: Jun 2011
Location: At a USO near you!
Posts: 715
Rep Power: 15 |
Quote:
Aww-HELL-yeah!!! We'll have: A Wild GUNNY Appeared! Unable to Flee... 
__________________
'94 Touring - Cursed '96 NA Miata '14 Mazda3 Hatch '14 Aprilia RSV4 R Quote:
Quote:
Quote:
|
||||
|
|
|
03-01-2014, 10:18 AM
|
#201 |
|
My minds tellin' me no...

Join Date: Feb 2008
Location: Murfreesboro, TN
Posts: 4,043
Rep Power: 22 |
This is one sick FB.
Are you gonna make to DGRR? LOLOLOLOLOLOL
__________________
1976 Mazda Cosmo RX-5 1976 Mazda Cosmo RX-5 2003 Toyota Tundra TRD 2015 Toyota 4Runner SR5 |
|
|
|
03-01-2014, 12:21 PM
|
#202 |
|
Professional Stick Poker
Join Date: Feb 2011
Location: Stafford, Ks.
Posts: 1,018
Rep Power: 16 |
Well I probably could have had it at least together and running in time if I wasn't so picky about having it work just right. I have rushed too many projects in the past to meet a deadline, and have always regretted it. I am chomping at the bit to get it running again though. I was hoping not to have it down this long, but sheiss happens.
__________________
1988 N/A SE 2+2, dead stock and staying that way. 1979 SA22C stock? Not so much. http://rotarycarclub.com/rotary_foru...ad.php?t=15585 |
|
|
|
03-10-2014, 03:55 PM
|
#203 |
|
Professional Stick Poker
Join Date: Feb 2011
Location: Stafford, Ks.
Posts: 1,018
Rep Power: 16 |
Since we were having the discussion of whether an oxygen acetylene torch was still useful, or just old school BS, I thought I would show what you can do with the "Torch" that can't be done with the new fangled toys. Questioned by ta Bawbers of all people.
The gussets are 3/8 plate and the reinforcing covers are 1/8" plate. None of the covers are actually straight. They had to be heated to cherry red along the bend lines and beat into place with a hammer. Welding as you go and doing a section at a time. I also had to put in a piece of tubing on the driver's side for a pass through for my brake line and wiring harness. It's getting a bit tight over there for room. Then made a cut on the extra left on the brake master cylinder side, heated and beat into shape to form the bottom of the pocket in my wheel well for the master cylinder. I love my plasma cutter, but there are some things it just won't do.  upper arm perch 3 by GySgtFrank, on Flickr  upper arm perch 4 by GySgtFrank, on Flickr  upper arm perch 5 by GySgtFrank, on Flickr As you can tell, lots of grinding for clean up left to do.
__________________
1988 N/A SE 2+2, dead stock and staying that way. 1979 SA22C stock? Not so much. http://rotarycarclub.com/rotary_foru...ad.php?t=15585 |
|
|
|
03-10-2014, 04:29 PM
|
#204 | ||
|
Rotary Fanatic

Join Date: Mar 2008
Location: Rockville MD
Posts: 456
Rep Power: 18 |
Looking good Kevin
You got just over a month to finish it.
__________________
93 Frozen Grey Metallic FD Build thread here 17 Camaro SS 1LE 04 RX-8 GT Quote:
Quote:
|
||
|
|
|
03-10-2014, 04:38 PM
|
#205 | |
|
Professional Stick Poker
Join Date: Feb 2011
Location: Stafford, Ks.
Posts: 1,018
Rep Power: 16 |
Quote:
__________________
1988 N/A SE 2+2, dead stock and staying that way. 1979 SA22C stock? Not so much. http://rotarycarclub.com/rotary_foru...ad.php?t=15585 |
|
|
|
|
03-10-2014, 04:47 PM
|
#206 |
|
Rotary Fanatic
Join Date: Feb 2008
Location: Front Royal, VA
Posts: 487
Rep Power: 18 |
Almost looking like a real car! Gunny I know all the hard work, blood sweet and tears you have in that. Hope you can bring the car this year!
|
|
|
|
03-21-2014, 02:18 PM
|
#207 |
|
Professional Stick Poker
Join Date: Feb 2011
Location: Stafford, Ks.
Posts: 1,018
Rep Power: 16 |
Done filling the extraneous holes and doing the rough grind on the new front frame structure. I was asked for pictures so here they are, you folks are gluttons for pictures.
It doesn't look that much different from the previous pictures, but it does look a lot cleaner than before in person. I'll go to my orbital sander and paper before I lay down the primer. No sense getting too carried away until I have it closed all the way up. Some of the welds were damn ugly, but I have most of the ones that will show in the engine bay cleaned up. The ones in the wheel wells wil get a good coating of primer, seam sealer, and undercoating. Again no sense getting carried away tidying those up too much.  filled and ground 1 by GySgtFrank, on Flickr 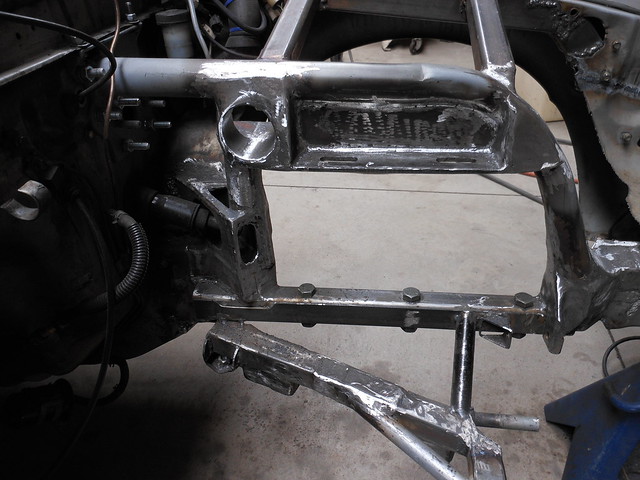 filled and ground 2 by GySgtFrank, on Flickr 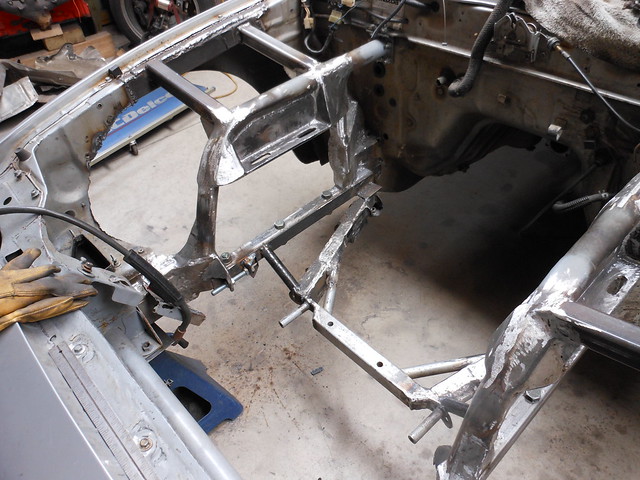 filled and ground 3 by GySgtFrank, on Flickr 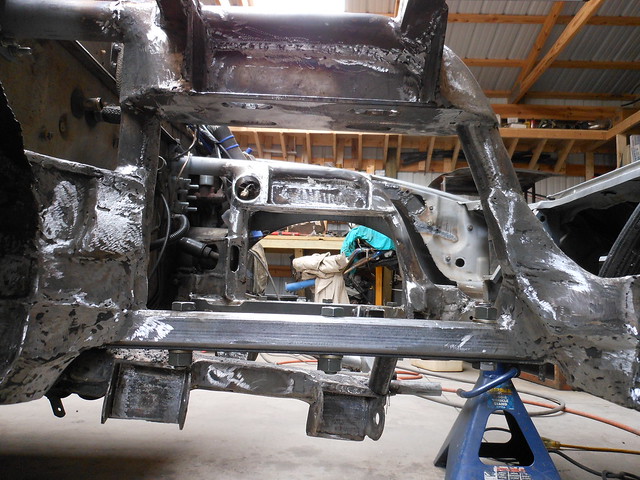 filled and ground 4 by GySgtFrank, on Flickr
__________________
1988 N/A SE 2+2, dead stock and staying that way. 1979 SA22C stock? Not so much. http://rotarycarclub.com/rotary_foru...ad.php?t=15585 |
|
|
|
03-21-2014, 02:54 PM
|
#208 |
|
Rotary Fanatic
Join Date: Apr 2008
Location: front royal va
Posts: 440
Rep Power: 18 |
Looking good gunny but are you going to have enough room for a turbo in there?
__________________
____________________________________________ 1976 Cosmo needing lots of work 1993 Rx-7 410 RWHP single turbo toy 1985 Rx-7 toy/project car 411HP stoplight terror 2001 Dodge ram 4wd.parts hauler 2016 Ram 2500 cause its a hemi 2006 VW TDI commuter __________________________________________ I guarantee there's a pregnant redneck teenager somewhere in a shitty trailer park that thinks "Ebola would be a lovely name for their child"... 
|
|
|
|
03-21-2014, 03:19 PM
|
#209 |
|
Professional Stick Poker
Join Date: Feb 2011
Location: Stafford, Ks.
Posts: 1,018
Rep Power: 16 |
Not sure. I've only lost about two inches of room across the engine bay. I've been trying my best not to encroach on the space for engine stuffs, but some compromises had to be made.
I've actually been really interested to see how AJ's screw style supercharger worked out for him. By the time the procrastinator general gets it on there though I'll probably be pushing up daisies.
__________________
1988 N/A SE 2+2, dead stock and staying that way. 1979 SA22C stock? Not so much. http://rotarycarclub.com/rotary_foru...ad.php?t=15585 |
|
|
|
03-21-2014, 03:46 PM
|
#210 | |
|
⊙⊙

Join Date: Dec 2009
Location: Great Falls
Posts: 1,258
Rep Power: 17 |
Whooooooo!
__________________
Quote:
|
|
|
|
 |
| Bookmarks |
| Thread Tools | |
| Display Modes | |
|
|


 Linear Mode

