|
|||||||


| Show your rotary car build up. Show off your Rotary Car build! |
 |
|
|
Thread Tools | Display Modes |
|
|||||||
| Show your rotary car build up. Show off your Rotary Car build! |
|
|
|
Thread Tools | Display Modes |
 05-12-2015, 07:12 AM
|
#16 | |||
|
Rotary Fan in Training

Join Date: Jun 2009
Location: Essex, MD
Posts: 32
Rep Power: 0  |
Quote:

__________________
Quote:
Quote:
|
|||

|
|
05-12-2015, 07:15 AM
|
#17 |
|
Waffles - hmmm good

Join Date: Aug 2008
Location: Huntersville, NC
Posts: 757
Rep Power: 0 |
I think the SA tranny will get the shifter closer to where you need it. Or maybe you can
futz with the tail shaft to shorten it. Either way you will need a custom driveshaft anyway.
__________________
1980 GS stockport, Fat Nikki, RB Dual Facetfuel pumps, Holley regulator, RB Street port exhaust, 2GDFIS, MR2 MK I electric fans, 2G strut bar, relayed fans, lights and fuel pump, LEDs Project Fat Nikki Budget 12A rebuild Video setup < $30.00 |
|
|
|
05-12-2015, 12:53 PM
|
#18 | ||
|
Professional Stick Poker

Join Date: Feb 2011
Location: Stafford, Ks.
Posts: 1,018
Rep Power: 16 |
Quote:
Quote:
__________________
1988 N/A SE 2+2, dead stock and staying that way.  1979 SA22C stock? Not so much. http://rotarycarclub.com/rotary_foru...ad.php?t=15585 |
||
|
|
|
05-13-2015, 12:19 AM
|
#19 |
|
Professional Stick Poker
Join Date: Feb 2011
Location: Stafford, Ks.
Posts: 1,018
Rep Power: 16 |
Doing the trial fitting. I'll try to document what I ended up doing as thoroughly as I can, in case anyone else ever wants to give this swap a go. I haven't been able to find any build threads on this swap that were very complete. Lots of questions on how others did it, but they didn't share.
Things are even tighter than I thought. I needed some room up front as the front of the rotary is more squared off and wider than the 1500. 1. original front cross member: 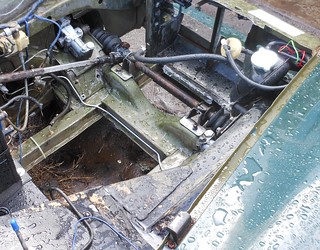 1. original crossmember by Kevin Frank, on Flickr 1. original crossmember by Kevin Frank, on Flickr2. sliced, hammered down, and re-welded:  2. sliced and welded by Kevin Frank, on Flickr 2. sliced and welded by Kevin Frank, on Flickr3. Trimmed and completed front cross member: 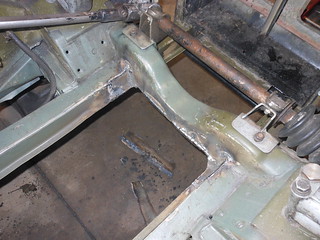 3. completed crossmember by Kevin Frank, on Flickr 3. completed crossmember by Kevin Frank, on FlickrGained 2.25 inches of room up front so I can set the engine down between the frame rails. It looks like I'm going to have to do some clearancing on the rails and the heater box area to the back of the engine as well.
__________________
1988 N/A SE 2+2, dead stock and staying that way. 1979 SA22C stock? Not so much. http://rotarycarclub.com/rotary_foru...ad.php?t=15585 |
|
|
|
05-13-2015, 05:21 AM
|
#20 |
|
Rotary Fan in Training
Join Date: Apr 2012
Location: NSW, Australia
Posts: 39
Rep Power: 0 |
Are the shifter distances you are talking about with the shifter shaft shortened and shifter housing moved forward of standard on the mazda boxes? Everyone does it to rx7 boxes here in aus to fit into the older rx bodies.
|
|
|
|
05-13-2015, 11:02 AM
|
#21 | |
|
Professional Stick Poker
Join Date: Feb 2011
Location: Stafford, Ks.
Posts: 1,018
Rep Power: 16 |
Quote:
__________________
1988 N/A SE 2+2, dead stock and staying that way. 1979 SA22C stock? Not so much. http://rotarycarclub.com/rotary_foru...ad.php?t=15585 |
|
|
|
|
05-13-2015, 04:45 PM
|
#22 |
|
Professional Stick Poker
Join Date: Feb 2011
Location: Stafford, Ks.
Posts: 1,018
Rep Power: 16 |
After more trial fitting, it has become apparent that the engine will not go in there without removing the shelf for the heater box and the ducting underneath it (The back of the engine block hits the ducting). I went ahead and took the battery tray out as well. This provides a lot of room to the rear. You could put a straight six in there with this part out. In fact one person did put a Jaguar DOHC six in one. It should also make taking the engine and transmission in and out a WHOLE lot easier.
original heater/battery tray: 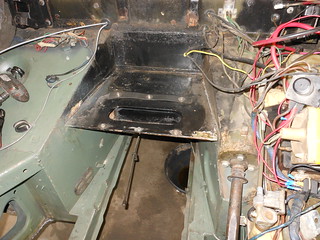 heater box and battery tray - original by Kevin Frank, on Flickr heater box and battery tray - original by Kevin Frank, on Flickrheater/battery tray removed: 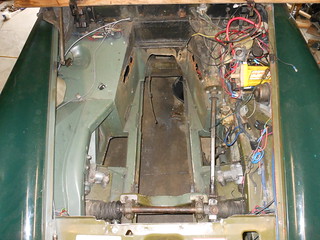 heater box and battery tray - removed by Kevin Frank, on Flickr heater box and battery tray - removed by Kevin Frank, on FlickrOnce I have the engine where it needs to be I'll look at rebuilding a spot for the heater. I can do without A/C if I have to, but a heater is important, even if it's only to defog the windshield. The battery will be relocated elsewhere. Getting that shelf out wasn't easy. I had to drill out a bunch of spot welds, make cuts with the plasma cutter, and do the fine cutting with a cut-off wheel so that I didn't damage something I needed.
__________________
1988 N/A SE 2+2, dead stock and staying that way. 1979 SA22C stock? Not so much. http://rotarycarclub.com/rotary_foru...ad.php?t=15585 |
|
|
|
05-14-2015, 04:06 PM
|
#23 |
|
Professional Stick Poker
Join Date: Feb 2011
Location: Stafford, Ks.
Posts: 1,018
Rep Power: 16 |
Another necessary modification. The permanent transmission crossmember is too high to slide the transmission into the tunnel. Technically all it really needed was to be notched so the transmission would clear. However a non-removable crossmember makes it a royal PITA if you need to drop the transmission. With the permanent crossmember you have to pull the engine and transmission in one unit to get it out of there. I went ahead and removed the center section of the crossmember and will fabricate some plates for the ends and bolt the modified section back in so that I don't compromise structural integrity.
original: 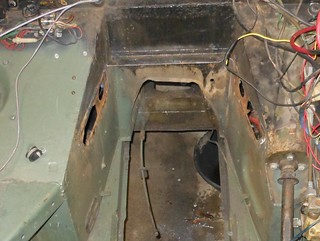 trans crossmember - original by Kevin Frank, on Flickr trans crossmember - original by Kevin Frank, on Flickrremoved: 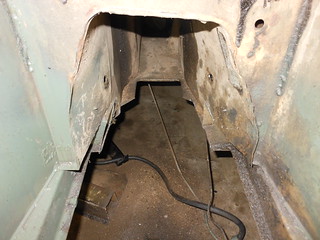 trans crossmember - removed by Kevin Frank, on Flickr trans crossmember - removed by Kevin Frank, on FlickrNow to try fitting it back in there. It doesn't appear that the transmission tunnel is going to require much modification to fit the NA transmission. I would imagine that the turbo transmission would be a different story as the NA trans barely fits.
__________________
1988 N/A SE 2+2, dead stock and staying that way. 1979 SA22C stock? Not so much. http://rotarycarclub.com/rotary_foru...ad.php?t=15585 |
|
|
|
05-14-2015, 07:14 PM
|
#24 |
|
Professional Stick Poker
Join Date: Feb 2011
Location: Stafford, Ks.
Posts: 1,018
Rep Power: 16 |
... and engine/trans in place about where it has to sit. I still need to notch the lower rails a little bit to allow the engine to sit a little lower, not as much as I was afraid that I would though. About 1/2 an inch on the passenger side rail should do it.
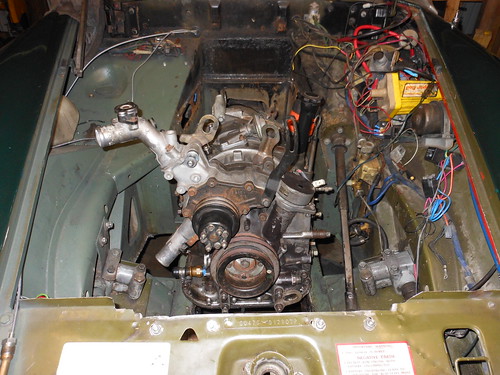 engine placement 1 by Kevin Frank, on Flickr engine placement 1 by Kevin Frank, on Flickr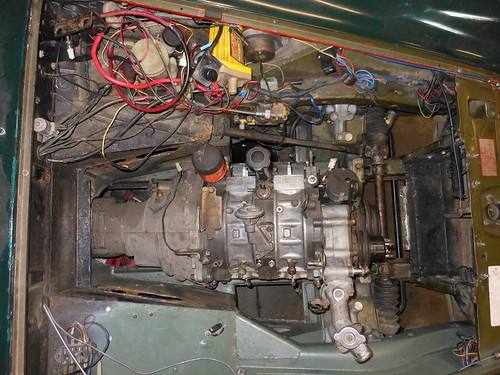 engine placement 2 by Kevin Frank, on Flickr engine placement 2 by Kevin Frank, on Flickr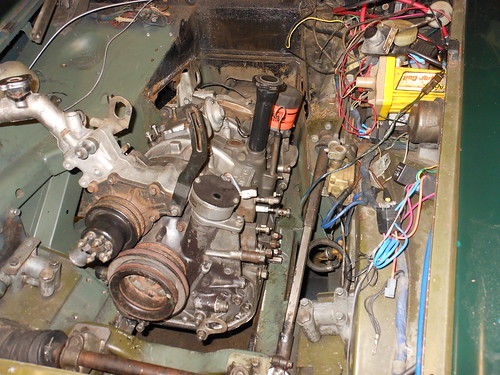 engine placement 3 by Kevin Frank, on Flickr engine placement 3 by Kevin Frank, on FlickrThe reason I say that it has to sit here is that it lines my exhaust ports up with the small opening for the exhaust to work it's way under the car. The engine is offset to the right (passenger side) by about an inch to line up with the differential input for a straight line shot with the driveshaft. 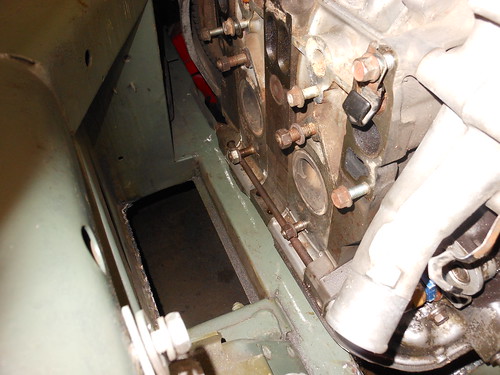 engine placement 4 by Kevin Frank, on Flickr engine placement 4 by Kevin Frank, on FlickrNeedless to say the coolant filler neck is going to need to be modified and shortened. I will need to cut and box the upper part of the passenger foot well to allow me to use the stock lower intake manifold. Just not enough room without doing it that way. Shouldn't be a problem as nobody has their feet or legs in that spot anyway. It's just wasted space, and space is at a premium with this swap. The shifter definitely has to be moved forward about 8.5 inches, or more. (edit: engine back out, measurement made - 9 3/8") Good news is that the end of the transmission tail shaft is only about 3.5 - 4 inches further back than the original 1500 transmission. That shouldn't cause too many problems, I hope.
__________________
1988 N/A SE 2+2, dead stock and staying that way. 1979 SA22C stock? Not so much. http://rotarycarclub.com/rotary_foru...ad.php?t=15585 Last edited by GySgtFrank; 05-14-2015 at 07:50 PM. |
|
|
|
05-17-2015, 09:38 PM
|
#25 |
|
Professional Stick Poker
Join Date: Feb 2011
Location: Stafford, Ks.
Posts: 1,018
Rep Power: 16 |
Here's my solution to a really short shifter. The first picture I had to steal off the internetz as I forgot to take a "before" picture. The FB box in the rear is very similar to the FC box that I have. The shifter box actually sits behind the tail shaft. This is a no go in my application.
So I moved the box forward 9 inches to put it in the stock MG shifter location. 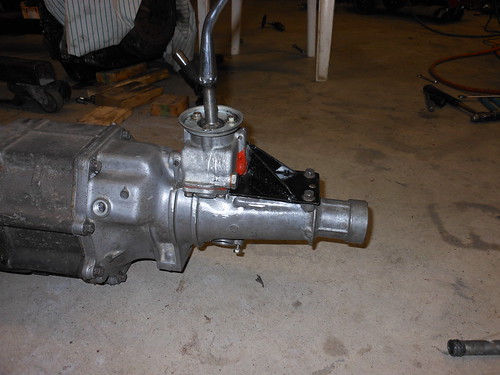 short shifter 2 by Kevin Frank, on Flickr short shifter 2 by Kevin Frank, on Flickr short shifter 1 by Kevin Frank, on Flickr short shifter 1 by Kevin Frank, on FlickrI've seen prettier renditions of this, but this is how I did it. The mount was cut off right next to the box and I used the side cover plate to attach a mount using the original rear bolts, one side bolt, and the locator pins. The shaft for the shifter was cut 9 inches and the roll pin hole re-drilled. (I had a machine shop do this for me as I always get the hole off center when I try to drill a round rod). The shaft is not hardened toward the rear so drilling it wasn't a problem. I also had to do a little "massaging" with a grinder on the tail shaft housing. This was necessary to get the box to sit all the way forward against the opening that the shifter shaft exits the case. It works, but it seems a little stiff right now. Could be that the shaft is binding a little bit which should work it ways out as it gets used or it may be that the RTV I used between the box and the case is pushed up against the shaft.  It does go in and out of all the gears just fine, so I'll give it a try as is. Right now I'm working on notching the lower frame rails to give me enough room to drop the engine a little lower in the frame.
__________________
1988 N/A SE 2+2, dead stock and staying that way. 1979 SA22C stock? Not so much. http://rotarycarclub.com/rotary_foru...ad.php?t=15585 |
|
|
|
05-17-2015, 10:09 PM
|
#26 |
|
Rotary Fanatic

Join Date: Aug 2011
Location: crockett ca.
Posts: 176
Rep Power: 0 |
thats a cool trick , looks great
|
|
|
|
05-21-2015, 06:48 PM
|
#27 |
|
Professional Stick Poker
Join Date: Feb 2011
Location: Stafford, Ks.
Posts: 1,018
Rep Power: 16 |
Thanks mattalac. Plenty of people have shortened the shifter before, but they usually didn't have to move it quite that far. The better way would have been to weld the box to a mount. I don't have a machine that will weld aluminum, so I went this way.
After about five days of work I finally have the frame modifications finished to make the engine fit in there the way I want it to. It took a while as the mods were more extensive than I thought they would be at first. You can see the original frame in the original crossmember picture above. (as usual I forgot to take a before picture) modified: 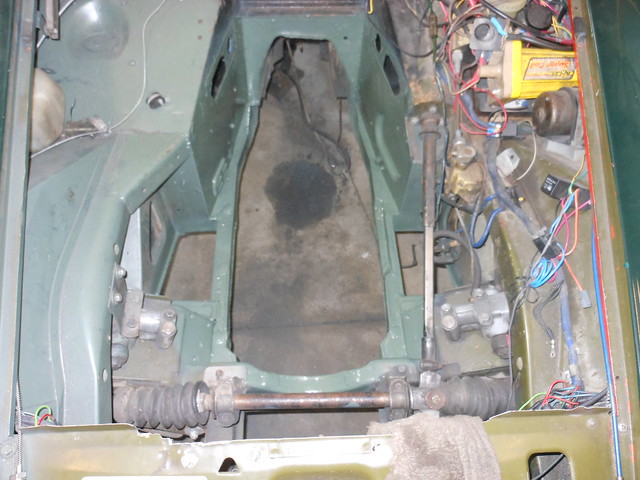 Frame mods 1 by Kevin Frank, on Flickr Frame mods 1 by Kevin Frank, on Flickr 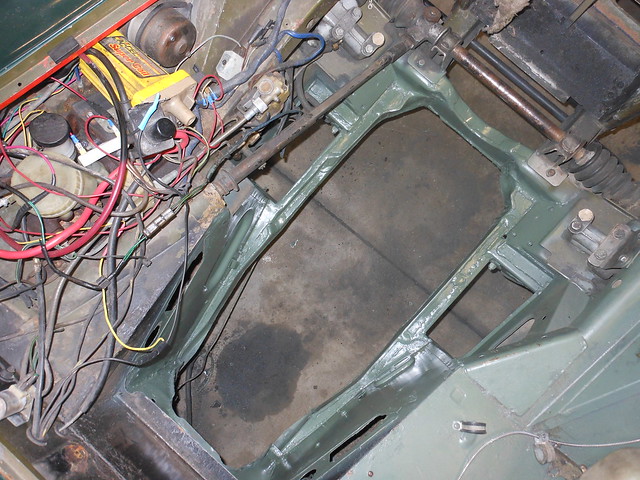 frame mods 2 by Kevin Frank, on Flickr frame mods 2 by Kevin Frank, on FlickrThe rotary is a lot wider at the bottom and made it necessary to widen the rails to set it down low. All the other threads I've seen on this set the engine above the frame rails, with attendant problems of the oil pan rails occasionally hitting. Not to mention what it does to the center of gravity. I welded in two 1/2 thick plates to the outside of each rail between the body tub and the suspension points. Excessive, but it covered the existing flange on the bottom of the rail perfectly. I then trimmed one inch from the inside of each rail and welded 1/8th inch plate to close off the inside. I had to notch the driver's side rail another inch or so for the oil cooler line and the oil bypass sticking out the side of the bottom middle iron. This ended up being the entire width of the rail except for the outer layer. The front crossmember had to be further trimmed to give me enough room to push the engine a little further forward. After taking part of it off I closed it in with more 1/8th inch plate. I then welded in 8 studs and crush tubes along the sides and front for a skid plate/ frame stiffener. It will bolt underneath to tie the entire front suspension together. It will be considerably stronger and stiffer than the original. Most people don't go this far for the swap, but I'm kind of anal about chassis stiffness and a low center of gravity.
__________________
1988 N/A SE 2+2, dead stock and staying that way. 1979 SA22C stock? Not so much. http://rotarycarclub.com/rotary_foru...ad.php?t=15585 Last edited by GySgtFrank; 05-21-2015 at 06:51 PM. |
|
|
|
05-25-2015, 07:09 PM
|
#28 |
|
Professional Stick Poker
Join Date: Feb 2011
Location: Stafford, Ks.
Posts: 1,018
Rep Power: 16 |
The fruits of my weekend.
After much trial fitting and head scratching, by Jove! I think I've got it. Engine mounts that is. There wasn't enough room to use the FB or FC stock pads so I improvised with polyurethane captured mounts originally intended for use in rear suspension lower swing arms. 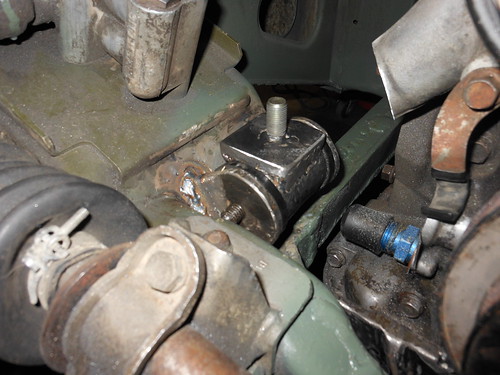 engine mounts 3 by Kevin Frank, on Flickr engine mounts 3 by Kevin Frank, on Flickr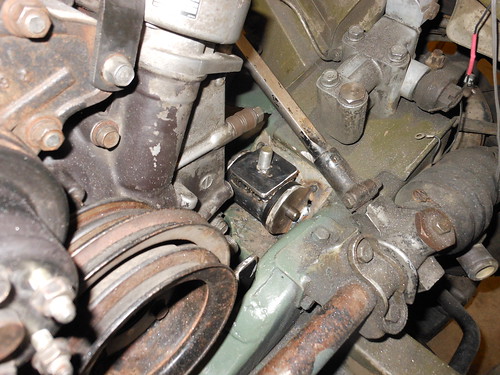 engine mounts 2 by Kevin Frank, on Flickr engine mounts 2 by Kevin Frank, on FlickrI will extend the front mounting plate over to each and bolt it to the top of each polyurethane mount. There's not a lot of give in this setup so engine placement is going to have to be pretty exact as far as engine angle vs. pinion angle before I weld it up. I used the bolt on approach because if I had simply welded the front plate to the mounts interference from the tabs would have made it nearly impossible to pull the engine without removing the front plate from the engine.
__________________
1988 N/A SE 2+2, dead stock and staying that way. 1979 SA22C stock? Not so much. http://rotarycarclub.com/rotary_foru...ad.php?t=15585 |
|
|
|
05-25-2015, 07:57 PM
|
#29 |
|
Rotary Fanatic
Join Date: Feb 2008
Posts: 201
Rep Power: 18 |
looking good
__________________
My deuce |
|
|
|
05-28-2015, 03:19 PM
|
#30 | |
|
Professional Stick Poker
Join Date: Feb 2011
Location: Stafford, Ks.
Posts: 1,018
Rep Power: 16 |
Quote:
Engine support bar done and the engine is mounted. Lots of fiddling to get bracing in there without interference. As you can see, not a lot of room to work with. This was as low and right as I dared to go. I plan to modify the oil pan/pickup to make the sump shallower and longer. I have full access to the bottom of the pan, but it does hang pretty low with the engine this far down. 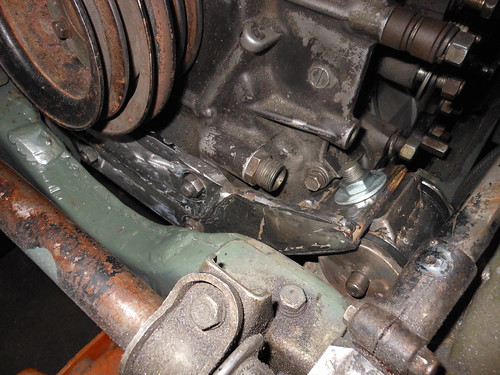 engine crossbar 2 by Kevin Frank, on Flickr engine crossbar 2 by Kevin Frank, on Flickr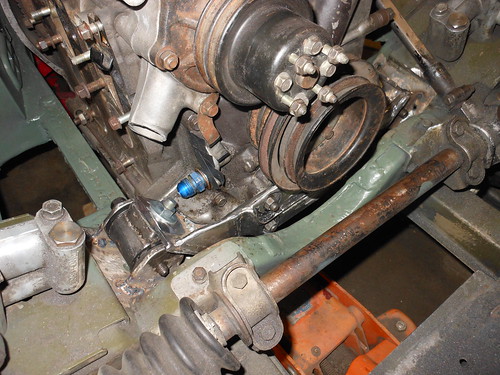 engine crossbar 1 by Kevin Frank, on Flickr engine crossbar 1 by Kevin Frank, on Flickr
__________________
1988 N/A SE 2+2, dead stock and staying that way. 1979 SA22C stock? Not so much. http://rotarycarclub.com/rotary_foru...ad.php?t=15585 |
|
|
|
|
| Bookmarks |
| Thread Tools | |
| Display Modes | |
|
|


 Linear Mode

