|
|
 10-03-2012, 02:58 PM
|
#1 |
|
World's Oldest Newb
Join Date: Oct 2012
Location: Chino Hills, CA
Posts: 15
Rep Power: 0  |
You do nice work, sir!
|

|
|
10-17-2012, 02:37 PM
|
#2 |
|
IT'S ALIVE!

Join Date: Dec 2009
Location: Richmond, VA
Posts: 811
Rep Power: 16 |
Not much going on. Waiting for the exhaust manifold to be finished so I can wrap up the engine mock up and wire the O2 sensors. I decided I didn't like the blue so I soaked the anodized TB parts in drain cleaner:
 After a little bit of polishing I cleaned and assembled the TB for the last time. It not gets wrapped up and stored away until it's time for final assembly.  After several hours of masking I get the intermediate housings all painted. No flashy colors here. Color is "cast iron." Fitting. 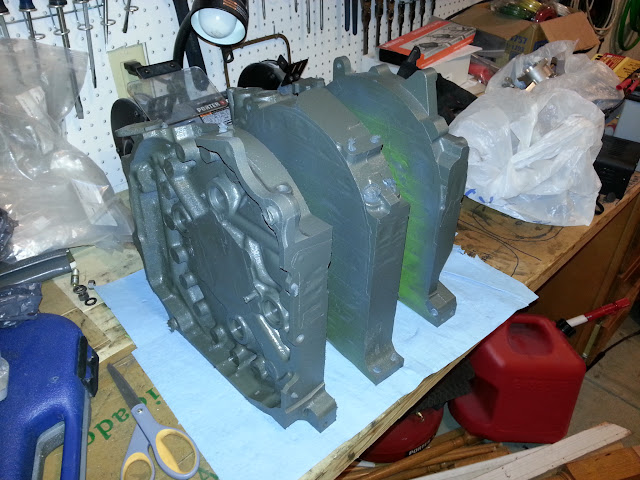 I've also painted all the misc. engine brackets and stuff black. The oil pan was stripped and repainted as well. I decided to make my own fiberglass fan shroud so I bought all the materiel for that. I now just need to find the time to get that made. Where I'm stuck and what has been a perpetual thorn in my side is ducting the inlet side of the oil cooler and radiator. Stock oil cooler and Koyo N-Flo radiator in the stock locations. No matter how I look at it I can't seem to visualize a good way to make the ducts and/or how to attach them to the car. The popular trend seems to be to make a new undertray and duct the oil cooler and radiator separately with the oil cooling vented underneath the car. Thoughts, pictures, examples? |
|
|
|
11-21-2012, 01:05 PM
|
#3 |
|
IT'S ALIVE!
Join Date: Dec 2009
Location: Richmond, VA
Posts: 811
Rep Power: 16 |
So I realize it's been over a month since I've updated. More on that later.
I've purchased just about everything else I need for this build except for a harness: I decided to stud the engine, rather than re-use the stock tension bolts.  This is the kit from Turblown. I also sourced two new OEM tension bolts for the "legs" of the keg. Also purchased: - New clutch slave cylinder and SS clutch line - RB primary injector plugs - RB oil pan baffle - RB "street" oil pressure regulator - RB aluminum flywheel, street/strip pressure plate, street/strip HD disk - Mazdatrix oil cooler lines - New OEM oil cooler brackets I probably won't use the little support plate RB supplies with the injector plugs as this is a N/A engine so the plugs will never see positive gage pressure and it's downright ugly. I'm going to have to tweak to th injector plugs a little as well because for some reason they extend into the flowpath of the intake ports. Nothing a little grinding won't fix.  That's all the parts that have been sitting in my garage for going on 3 weeks now. I said I haven't been able to get much done and this is primarily for two reasons: 1. Still can't figure out a design for the radiator/undertray I like. 2. Our first child was born 10/26:  Hopefully as things calm down I'll be able to get back out to the garage. Goal is still to fire up in the Spring. |
|
|
|
11-21-2012, 01:14 PM
|
#4 |
|
My minds tellin' me no...

Join Date: Feb 2008
Location: Murfreesboro, TN
Posts: 4,043
Rep Power: 22 |
Congrats on the little one!
Mine is about to turn 3, and I can't believe my DNA spawned so much awesome.
__________________
1976 Mazda Cosmo RX-5 1976 Mazda Cosmo RX-5 2003 Toyota Tundra TRD 2015 Toyota 4Runner SR5 |
|
|
|
11-22-2012, 08:50 AM
|
#5 |
|
Rotary Fan in Training

Join Date: Mar 2011
Posts: 32
Rep Power: 0 |
Love how u wired everything great job
__________________
-88 SE -Wht on Blk, Goopy motor, HKS TO4r, Haltech PS 1000, FD UIM, a1000 pump & FPR,....(underconstruction) -91 tII -Blk on blk -(SOLD) |
|
|
|
11-30-2012, 11:25 AM
|
#6 | ||
|
IT'S ALIVE!
Join Date: Dec 2009
Location: Richmond, VA
Posts: 811
Rep Power: 16 |
Quote:
 Quote:
So quick question on PCV systems. I no longer have a purge control valve or the port on the center iron. Right now I have the vent on the oil filler neck connected back to the charcoal cannister, using it like a vented catch can. Will this cause problems? Should I add a dedicated oil catch can and leave it vented or would it be better to plumb it back into the intake? |
||
|
|
|
01-28-2013, 11:16 AM
|
#7 |
|
IT'S ALIVE!
Join Date: Dec 2009
Location: Richmond, VA
Posts: 811
Rep Power: 16 |
It's been a while since I've updated this. Been busy with the baby for the most part but I managed to get a few things done. Painted a bunch of stuff:
Intake manifold:  T-stat cover (ground off misc. features):  Water pump:  I decided to redo the ignitor mount design a little. I went with thicker plastic spacers instead of metal for better insulation/retention:  Modified/painted the RB injector plugs. They no longer extend into the intake flowpath:  Bought/installed harness for driver's side and installed most of the interior again:  Bought a neat oil catch can so I'm not using the charcoal cannister as one:  Pulled steering rack to de-power: Before:  After:  Need to figure out a few things to the de-powering process since TitaniumTT's sticky is missing a couple pictures. Still shouldn't be too difficult. Still waiting on my header from Logan @ Defined and put in an order for an ISC Racing front splitter. Toying with the idea of buying one of the vented hoods from Shine Auto Project. |
|
|
|
01-29-2013, 08:54 AM
|
#8 |
|
IT'S ALIVE!
Join Date: Dec 2009
Location: Richmond, VA
Posts: 811
Rep Power: 16 |
Got a little more work done last night. Unfortunately I can only work ~1 hour during the weeknights with my current schedule so progress is slow. Got the rack/pinion completely diassembled:
 Followed TTT's how-to thread and cut off the seal on the rack, and removed the bearing to get to the snap ring holding the seals on the pinion. I also pulled the spring out of the seal on the rack support.  There's still a seal (or two?) inside the rack housing that I need to figure out how to remove so I can pull their springs as well. Next step: weld up the pinion to remove the "slop:" 
|
|
|
|
02-01-2013, 11:04 AM
|
#9 |
|
IT'S ALIVE!
Join Date: Dec 2009
Location: Richmond, VA
Posts: 811
Rep Power: 16 |
The ISC Racing splitter came in on Wednesday. It's certainly a no-frills fiberglass racing splitter. I'm going to need to be careful with this.
  Their "mounting kit" was unavailable so I need to figure out my own way of installing it. I want to incorporate Dzus fasteners for ease of installation and removal. |
|
|
|
02-03-2013, 09:01 PM
|
#10 |
|
IT'S ALIVE!
Join Date: Dec 2009
Location: Richmond, VA
Posts: 811
Rep Power: 16 |
Got the housing cleaned up. Cut off and welded up the P/S ports on the rack housing and plugged the ports on the pinion housing with QuikSteel (no TIG and couldn't find the right bolts).
  I also welded up the pinion but my welds kind of suck so I'd rather not share that picture on the internet. I just need to find a way to paint the housing (too damn cold!) and I can put everything back together again. I also started to mess with the TII side skirts I've had lying around for over a year since I'm going to do some body work with this build. I bought the side skirts second (or third?) hand so they're missing several clips and things, which are NLA from Mazda. I'm going to have to be a little creative to install these... |
|
|
|
02-11-2013, 09:44 AM
|
#11 |
|
IT'S ALIVE!
Join Date: Dec 2009
Location: Richmond, VA
Posts: 811
Rep Power: 16 |
Got the steering de-power done:
 I still need to find and mark "center" for reinstalling. I've counted lock-to-lock on the pinion shaft and I'm coming up somewhere between 2.5 and 3, which is weird because I'm 90% certain I had the electronically controlled (vehicle speed sensing) power steering, which is supposed to be like 3+ turns lock-to-lock. Is the inner tie rod supposed to be able to slip through the rack "plug" (the thing with the lock wire) on the passenger side? Mine doesn't. I also picked up another set of TII side skirts in MUCH better condition than my previous ones. These still have 90% of the original clips so it'll make installing them that much easier.  I'm also in the process of selling my current 16x8 RPF1's. The new setup will be 17x9. |
|
|
|
02-21-2013, 08:59 AM
|
#12 |
|
IT'S ALIVE!
Join Date: Dec 2009
Location: Richmond, VA
Posts: 811
Rep Power: 16 |
New wheels and tires arrived!
17x9 +22 Enkei RPF1 in black with 255/40R17 Dunlop Direzza ZII (successor to the Star Specs):  Comparison of 255/40R17 versus 205/60R15 (what's on the car now). I'm surprised how great the diameter difference is.  Unfortunately the hub rings that came with the wheels don't fit (59.2 mm != 59.6 mm, thanks Tirerack!) so I didn't mess with mounting the wheels just yet. Here's a couple mock up shots:   Just a little bit of poke in the front  (Shine wide fenders coming soon). (Shine wide fenders coming soon). Inside clearance is tight in the front but looks doable. I'll check again when the hub rings come in and I put the car back on the ground. I assume the inside clearance in the rear will be just fine but I'll likely be massaging the fenders a bit. |
|
|
|
02-21-2013, 10:05 AM
|
#13 |
|
RCC Addict
Join Date: Feb 2008
Location: VA
Posts: 1,812
Rep Power: 19 |
Nice man. The shine fronts will clear that easily. I have 17x9 +20 up front with Shine's fenders and it has plenty of clearance...
What do you plan on doing for the rear fenders? |
|
|
|
02-21-2013, 10:54 AM
|
#14 | |
|
IT'S ALIVE!
Join Date: Dec 2009
Location: Richmond, VA
Posts: 811
Rep Power: 16 |
Quote:
I plan on just rolling/pulling the rear fenders since there's a lot more material to work with back there. |
|
|
|
|
02-21-2013, 08:02 PM
|
#15 |
|
RCC Addict
Join Date: Feb 2008
Location: VA
Posts: 1,812
Rep Power: 19 |
I honestly dont have a stock fender laying around but I'd say the front is wider than 20mm over stock... don't know on the rear (not using their rear fenders.... yet). The shine front fender has a 20 degree less cut on the arch, that may be where you got the 20mm vs the normal 30mm. They are modeled after the foresight fender which is 30mm. If you need me to take a fender off and make measurements... let me know.
|
|
|
 |
| Bookmarks |
|
|


 Hybrid Mode
