![]() |
#16 |
The Newbie
Join Date: Oct 2009
Location: Phoenix
Posts: 14
Rep Power: 0 ![]() |
Nice !
|
![]() |
![]() |
![]() |
#17 | |
frustrated!
Join Date: Apr 2009
Location: Montana
Posts: 611
Rep Power: 17 ![]() |
Quote:
NICE FD! I love them in white. Look forward to some creative building. BTW the wheels are sick!
__________________
Same pig, new soul ![]() |
|
![]() |
![]() |
![]() |
#18 | ||
Rotary Fanatic
Join Date: Dec 2008
Location: Mesa, Arizona
Posts: 114
Rep Power: 17 ![]() |
Quote:
Here's some pics of them now with how they look after tinting. With camera's flash: ![]() Without flash: (more like what they actually look like -- black) ![]() Quote:
![]() |
||
![]() |
![]() |
![]() |
#19 |
Rotary Fan in Training
Join Date: Jul 2008
Location: Under my car
Posts: 99
Rep Power: 17 ![]() |
Wow. That's not a lot of offset.
If you aren't gonna track the car at all, it probably won't matter though. Same goes with the drilled rotors, but be careful because they are prone to cracking under even fairly moderate use with aggressive pads. |
![]() |
![]() |
![]() |
#20 | ||
Rotary Fanatic
Join Date: Dec 2008
Location: Mesa, Arizona
Posts: 114
Rep Power: 17 ![]() |
My SuperPro bushings finally came Friday so I got everything ready to take down to Scottsdale Automotive today to get new pillow balls and bushings pressed in. In the rear suspension I'm replacing 6 pillowballs with brand new OEM and 12 other bushings with the SuperPro polyurethane replacements. If all this doesn't get rid of the clunking in the rear I don't know what will.
![]() I had a heck of a time trying to get that 17mm nut off the swaybar endlink/lower shock mount. I broke 2 old socket wrenches, 2 3/8" drive 17mm sockets (splayed them apart), and 3 1/2" to 3/8" adapters before I finally got it apart with a 1/2" drive socket wrench with a 5 ft breaker bar. Some of the sockets and socket adapters I broke were name brand (Craftsman) "high end" impact ones too -- they broke with the same applied torque as the cheapo Harbor Freight ones. (it figures -- chrome vanadium is chrome vanadium) There will definitely be more "survival of the fittest" going on in my toolbox as this project goes on. I've got some new Chrome-moly socket wrenches and chrome-moly sockets now so we'll see if I can't break them when taking out the 15 year old twins later on. :-) Quote:
FD Stock offset is +50mm on a 16x8 rim and thats what the suspension geometry was designed for. These are +45mm 18x9.5. +45mm is pretty dang close to keeping stock offset, scrub radius and still fitting some wider tires. Any more offset with the same size rim will hit my trailing arms. Any less offset and you end up with the 4x4 look and increased stress to wheel bearings which is also not something we're after. Quote:
![]() |
||
![]() |
![]() |
![]() |
#21 |
Rotary Fanatic
Join Date: Mar 2008
Location: Phoenix, AZ
Posts: 288
Rep Power: 18 ![]() |
Looking good! Just got my aftermarket IAT sensor yesterday. Can't wait to get that sucka installed. Making good progress Jesse!
|
![]() |
![]() |
![]() |
#22 | |
Rotary Fanatic
Join Date: Dec 2008
Location: Mesa, Arizona
Posts: 114
Rep Power: 17 ![]() |
Quote:
We'll be in Vegas for the SEMA show this week. All the nice cars are really good for motivation to get this buildup done. Since you're not going this year, this year will probably be the year lots of nice RX cars are on display. ![]() |
|
![]() |
![]() |
![]() |
#23 | |
Rotary Fanatic
Join Date: Mar 2008
Location: Phoenix, AZ
Posts: 288
Rep Power: 18 ![]() |
Quote:
|
|
![]() |
![]() |
![]() |
#24 |
Rotary Fanatic
Join Date: Dec 2008
Location: Mesa, Arizona
Posts: 114
Rep Power: 17 ![]() |
I really struggled to get this part off today for differential bushing replacement. I tried to do it without dropping the differential and disconnecting the PPF which may have been a bad move. It needed a small breaker bar to loose the 4 nuts holding this bracket to the top of the differential and there was just no room to get any leverage or length on the breaker bar.
![]() There is a pile of oily dirt underneath the car now in the garage from all the rummaging around I had to do get those nuts out. Between that and whats all over my hands, I figure I've shaved .1 second off my 0-60 just due to the weight reduction. :-) I had no idea it was going to be as messy a job as it ended up being. |
![]() |
![]() |
![]() |
#25 |
Rotary Fanatic
Join Date: Oct 2008
Posts: 274
Rep Power: 17 ![]() |
Just a little messy.
|
![]() |
![]() |
![]() |
#26 |
Rotary Fanatic
Join Date: Dec 2008
Location: Mesa, Arizona
Posts: 114
Rep Power: 17 ![]() |
Old wheels/tires (17" 235s) vs. new wheels/tires (18" 285s):
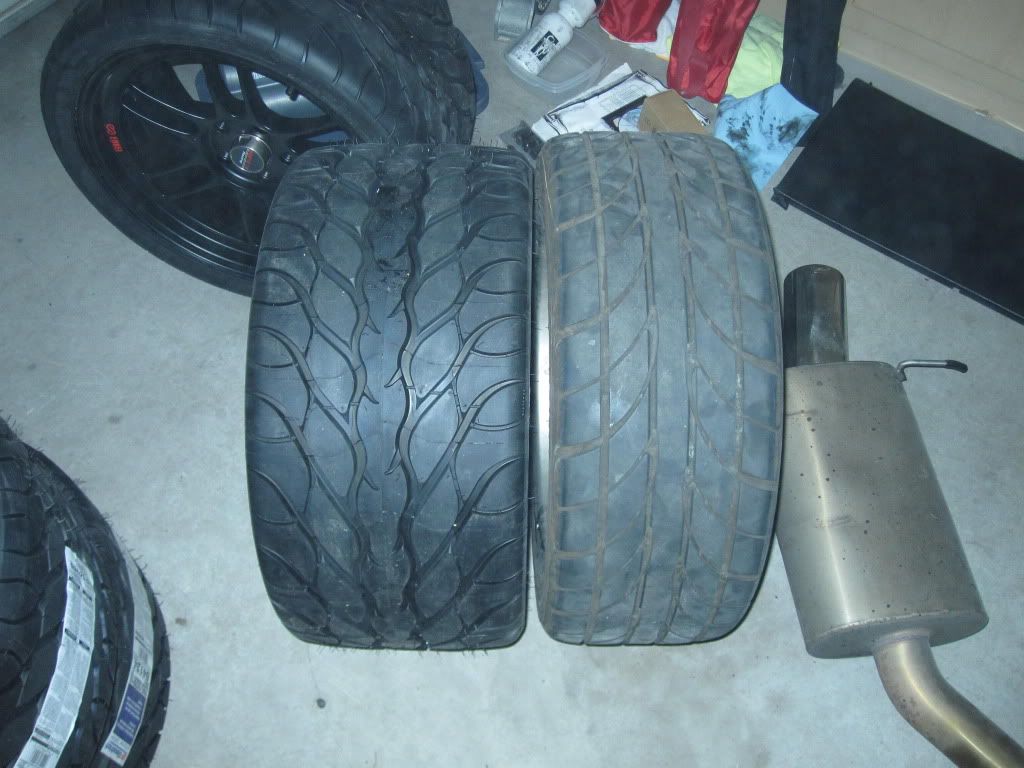
![]() Despite being a lot wider, the new wheel combo is actually 4 lbs lighter than the old. (44 vs. 48) Other things I did last weekend: - changed rear brake lines to stainless lines - went over to a friend's who had a 12-ton press to press in rear pillow balls and bushings. - botched putting another coat of clear on the tinted lights. Ended up with horrible orange-peel/crackling and had to wet sand, buff, and recoat. - removed fuel pump for AZRR to modify bracket for Bosch 044: ![]() |
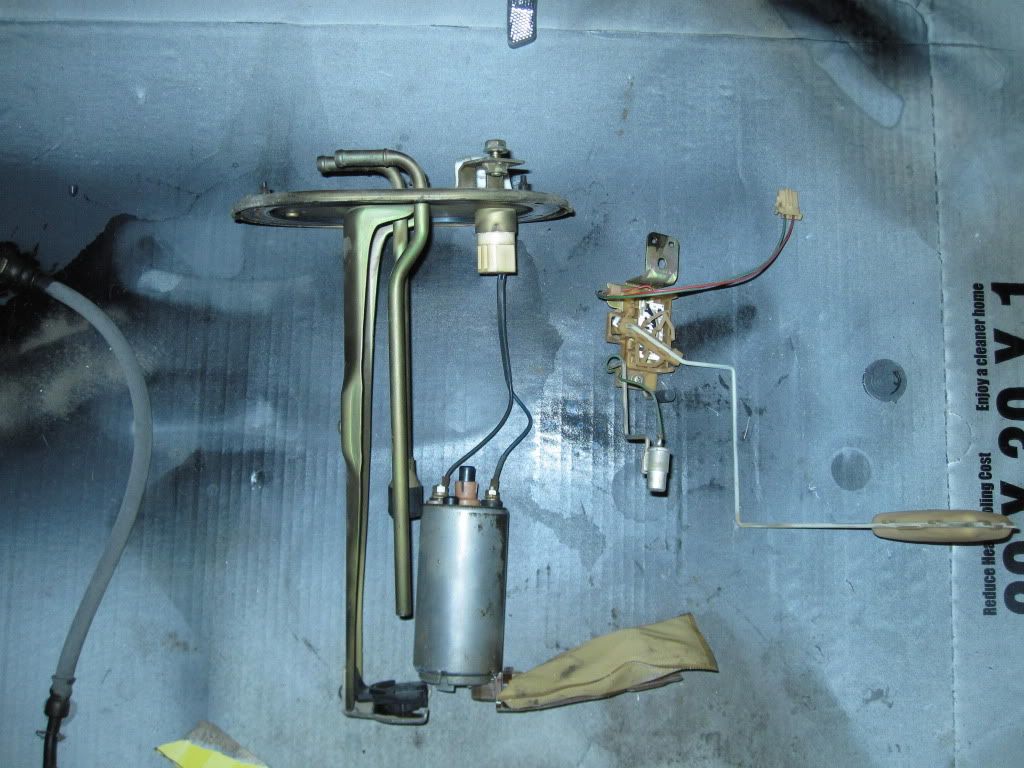
![]() |
![]() |
![]() |
#27 |
Sua Sponte
Join Date: Feb 2008
Location: Killeen, TX
Posts: 839
Rep Power: 18 ![]() |
project looks great!
__________________
Road Atlanta August 2011 NASA TT 1:33 http://www.youtube.com/watch?v=IFY00PAK_Ps Traqmate's video of my car from the 2011 UTCC at VIR http://www.youtube.com/watch?v=2Zcn6...layer_embedded Video of Yellow LS1 FD at NASA TT at VIR http://www.youtube.com/watch?v=e6k0lJkcwrM |
![]() |
![]() |
![]() |
#28 |
Rotary Fanatic
Join Date: Dec 2008
Location: Mesa, Arizona
Posts: 114
Rep Power: 17 ![]() |
Well, I finally got all the bushings replaced in the rear and put everything back together.
$4 home depot bushing installer since using a press here was an exercise in futility. It was about impossible to get the bushing started straight without this. ![]() Without the swaybar and shock/spring installed, I used a jack to check clearances at max travel. The first thing to hit is the fender lip, shown here. A slight fender roll/pull should fix this. ![]() Front inside wheel well I have about a penny's diameter from the trailing arm to the tire. This is what I was most concerned about in the rears -- I found one spreadsheet online that said 285's on 9.5" rims w/ 45 offset would not fit and that I'd hit the trailing arm. Not so. The rotors ended up being slightly thicker than the OEM ones too which helped. I'm hoping having replaced the bushings in the trailing arms/toe links with stiffer superpros should keep any dynamic toe-in to a minimum since it would reduce this spacing. ![]() Another pic of wheel/tire fitment: ![]() Overall, I am very happy with how the wheel fills the wheel well. I am not a fan of low offset wheels that stick out too much and give the look of a 4x4. This is the limit of what I consider still looks good. ![]() After replacing the upper arm bushings, it was a major pain to get this piece reinstalled. I had to use a large flat head screw driver as a crow bar to even get this started and then had to pound it in with a 4-lb hammer. Since they are so tight, I'm worried about squeeking. |
![]() |
![]() |
![]() |
#29 |
Rotary Fan in Training
Join Date: Nov 2008
Location: Aurora, CO
Posts: 59
Rep Power: 17 ![]() |
Try some silicone spray lubricant where the bushing meets the chassis.
|
![]() |
![]() |
![]() |
#30 |
Rotary Fanatic
Join Date: Feb 2008
Posts: 432
Rep Power: 18 ![]() |
the only problem with ballooned tires is the will have premature wear. i like the white on black though. nice project
__________________
![]() '93 SSM Touring-S475... ![]() '87 Tii-LS1/T56 |
![]() |
![]() |
![]() |
Bookmarks |
|
|