 07-22-2015, 06:39 PM
|
#121 | |
|
RCC Addict
Join Date: Feb 2008
Location: VA
Posts: 1,812
Rep Power: 19  |
Quote:
|
|

|
|
07-22-2015, 07:02 PM
|
#122 | |
|
Professional Stick Poker

Join Date: Feb 2011
Location: Stafford, Ks.
Posts: 1,018
Rep Power: 16 |
Quote:

__________________
1988 N/A SE 2+2, dead stock and staying that way.  1979 SA22C stock? Not so much. http://rotarycarclub.com/rotary_foru...ad.php?t=15585 |
|
|
|
|
07-23-2015, 10:40 PM
|
#123 |
|
Professional Stick Poker
Join Date: Feb 2011
Location: Stafford, Ks.
Posts: 1,018
Rep Power: 16 |
Finished the fuel tank portion of the rear enclosure.
 fuel enclosure welded in by Kevin Frank, on Flickr fuel enclosure welded in by Kevin Frank, on Flickr... and with the top bolted on. I went with a bolt on top cover so That I would have easy access to the pump and lines in the future.  fuel enclosure with top by Kevin Frank, on Flickr fuel enclosure with top by Kevin Frank, on FlickrI did have a bit of a problem. When I built the enclosure I fitted it to the car, then removed it for final welding. Checked it by re-installing and everything was fine. Cut out the top piece, drilled all the holes, and welded the nuts on the bottom. Re-fitted, everything was fine. Welded the enclosure in without the top so I could reach the areas I needed to weld, prepped, and painted all the bare metal and places the paint bubbled. Put the top on (some of you know where this is going already) and Voila! none of the holes matched up anymore. It distorted enough that I couldn't put the bolts in. I had to break out the carbide bit and grind out each hole so that the bolts would go in. Sometimes I ain't the sharpest spine on the cactus. I did add an extra vent to the fuel inlet pipe to try and prevent premature cutoff of the fuel station pump when filling up. I plan to run this together with the tank vent, then both to a rollover valve mounted where the original valve was at. It was located well above the new enclosure on an inside trunk brace, then routed to a bulkhead fitting in the side floor of the trunk area. The vent at the tank (and my new fittings) are all 1/2 inch inside diameter tubing. I believe this should be sufficient as it was what the stock setup was using. I will need to coat all the weld areas in seam sealer, and undercoat all the exposed parts underneath, when completely finished. High density foam will be used around the top flange to seal the top cover, an aluminum plate will replace the heavy steel one eventually. I had planned to cover the trunk area in carpet to match the interior when done so that it has a nice finished look to it. 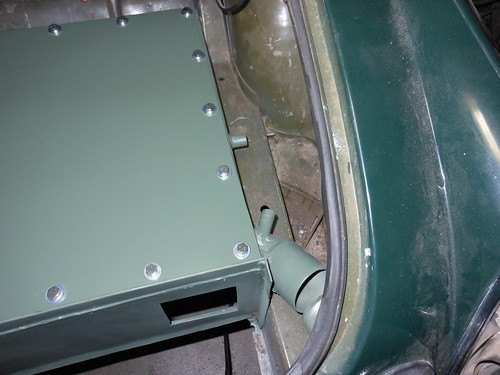 fuel enclosure pass throughs by Kevin Frank, on Flickr fuel enclosure pass throughs by Kevin Frank, on FlickrNow on to the muffler enclosure directly behind this one. The metal plate at the back (the one with the ventilation holes in it) is only there as a heat shield to prevent heat transfer from the hot muffler to the fuel tank.
__________________
1988 N/A SE 2+2, dead stock and staying that way. 1979 SA22C stock? Not so much. http://rotarycarclub.com/rotary_foru...ad.php?t=15585 Last edited by GySgtFrank; 07-23-2015 at 10:53 PM. |
|
|
|
07-23-2015, 11:17 PM
|
#124 | |
|
⊙⊙

Join Date: Dec 2009
Location: Great Falls
Posts: 1,258
Rep Power: 17 |
Holy bolts batman. Looks good it also looks like one of those times a bead roller would have come in very handy to make flush cutouts. I guess why have access to parts when you can have access to the whole thing EH!
Did you say you have an FC Fuse Box if not I found 3 today...
__________________
Quote:
|
|
|
|
|
07-23-2015, 11:34 PM
|
#125 | |
|
Professional Stick Poker
Join Date: Feb 2011
Location: Stafford, Ks.
Posts: 1,018
Rep Power: 16 |
Quote:
 Yes I could use an entire s4 harness or any part thereof. Brian is looking around for me, but he hasn't found one yet. I hate to cut up the one in the SA just to finish this car.
__________________
1988 N/A SE 2+2, dead stock and staying that way. 1979 SA22C stock? Not so much. http://rotarycarclub.com/rotary_foru...ad.php?t=15585 |
|
|
|
|
07-24-2015, 12:26 AM
|
#126 | |
|
⊙⊙
Join Date: Dec 2009
Location: Great Falls
Posts: 1,258
Rep Power: 17 |
Oh you got the FC fuse panel I was thinking of installed already..
Might be easier to build a harness. Although might save the building new for the SA not the Midge.
__________________
Quote:
|
|
|
|
|
07-24-2015, 12:40 AM
|
#127 | |
|
Professional Stick Poker
Join Date: Feb 2011
Location: Stafford, Ks.
Posts: 1,018
Rep Power: 16 |
Quote:
I am going to have to build most of a new harness for the SA as I plan to go with the Syvecs ECU, but the harness is integrated into the car and bits of the old harness. I didn't want to cut it up because I will forget where shit goes by the time I get back to it. Hell, I've forgotten where most of it goes since I built it a few years ago. I will do it if I have no other choice though.
__________________
1988 N/A SE 2+2, dead stock and staying that way. 1979 SA22C stock? Not so much. http://rotarycarclub.com/rotary_foru...ad.php?t=15585 |
|
|
|
|
07-24-2015, 12:51 AM
|
#128 | ||
|
⊙⊙
Join Date: Dec 2009
Location: Great Falls
Posts: 1,258
Rep Power: 17 |
Quote:
Is an FC panel different? If so I will send ya one just PM me your address.
__________________
Quote:
|
||
|
|
|
07-24-2015, 01:06 AM
|
#129 | |
|
Professional Stick Poker
Join Date: Feb 2011
Location: Stafford, Ks.
Posts: 1,018
Rep Power: 16 |
Quote:
That is an FC panel. The entire wiring harness in the SA, front to rear, is from a 1987 GXL. The only thing left from the SA harnesses are the pigtails to things like the heater motor, some of the dash/interior lights, tail lights, and headlight bulbs/motors. I didn't like the FC climate control system and retained the original manual style climate controls. I have had enough trouble with the CPU. I really didn't need to deal with the logicon bundle of snakes.
__________________
1988 N/A SE 2+2, dead stock and staying that way. 1979 SA22C stock? Not so much. http://rotarycarclub.com/rotary_foru...ad.php?t=15585 |
|
|
|
|
07-27-2015, 10:41 PM
|
#130 |
|
Professional Stick Poker
Join Date: Feb 2011
Location: Stafford, Ks.
Posts: 1,018
Rep Power: 16 |
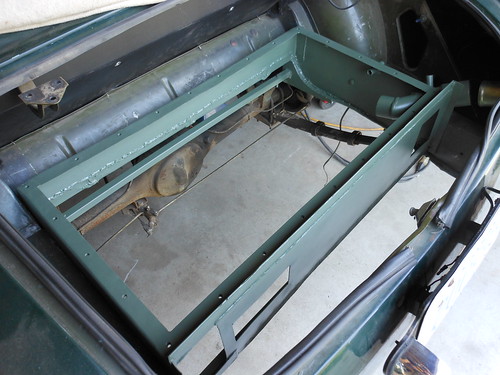
The rear panel is finished and ready to be welded in. This panel will sit at the very back of the trunk area, forming the rear bulkhead of the enclosure. I thought this one would be simple and quick to fabricate. Again I was ... uhh ... less than correct. Getting the exact width took a few tries. I then had to weld in one of my extra oxygen sensor bungs and plugs to provide access to a phillips head screw, the screw retains the trunk lid latch. Once the panel is welded in it would have been impossible to remove the trunk latch without some sort of an access port. I thought about using a rubber grommet, but the heat in this area may have been a problem with a grommet. I formed two hot air vent ducts after that. They slide into the rear backup light openings on the rear valence of the car. They were a bit finicky to get exactly right. The rear backup lights will be moved and the vents covered with mesh screen. Bezels will be fabricated to hold down the screen and provide a finished look to the vents. I did this to provide more ventilation around the muffler. I was concerned that I would get too much heat buildup in that enclosed area without some way to exhaust the hot air from the top of the box.
 rear panel 2 by Kevin Frank, on Flickr rear panel 2 by Kevin Frank, on Flickr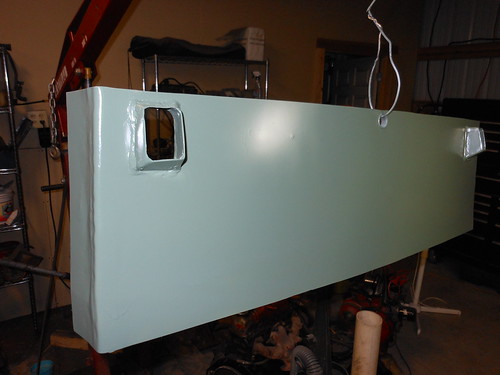 rear panel 1 by Kevin Frank, on Flickr rear panel 1 by Kevin Frank, on Flickr
__________________
1988 N/A SE 2+2, dead stock and staying that way. 1979 SA22C stock? Not so much. http://rotarycarclub.com/rotary_foru...ad.php?t=15585 |
|
|
|
08-08-2015, 04:05 PM
|
#131 |
|
Professional Stick Poker
Join Date: Feb 2011
Location: Stafford, Ks.
Posts: 1,018
Rep Power: 16 |
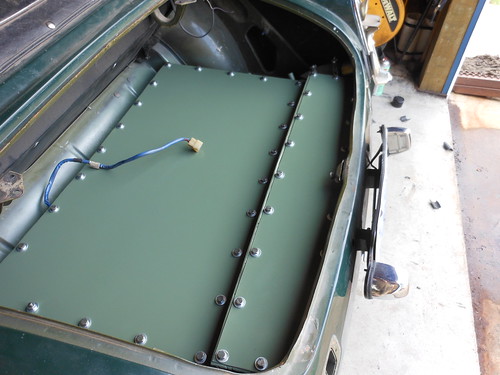
More or less finished with the rear enclosure. Once the seam sealer dries I will coat the entire under side with black undercoating. I figured you already know what that looks like and it's easier to see with just the paint and sealer.
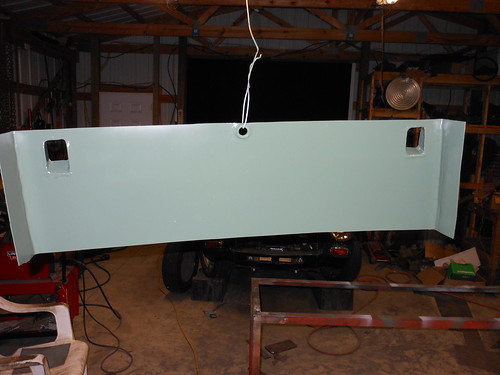
For those of you that haven't been following along, and are wondering exactly what kind of lunacy I'm up to, I raised the trunk (boot) floor to provide room for a 1987 FC RX7 fuel tank and a separate area behind it so I could fit a full size muffler. The RX7 tank is longer wider and taller than the original necessitating a little bit of modification for it to fit. It will fit between the rails with about three inches of clearance on the left side for exhaust pipe routing and still have enough room behind it for a muffler.  rear enclosure - painted and sealed 1 by Kevin Frank, on Flickr rear enclosure - painted and sealed 1 by Kevin Frank, on FlickrIt doesn't look like much, but it took a lot of time and work to get it built and welded in. I used seam sealer on all welds that could leak if there are any pinholes that I may have missed. The top lids are removable for servicing the fuel system and muffler (not shown). I installed cross braces in the muffler box to provide solid mounting points for the muffler without hanging them from the top cover. That would be a real inconvenience when I remove the cover. I will get it sprayed with undercoating and re-install the tank (again), then take a few more pictures with it installed. For anyone contemplating this swap, all this rigamarole is not absolutely necessary. You could use an external high pressure pump with the original tank and small mufflers that fit in the existing space. Unfortunately then you are stuck with the tiny fuel capacity, a noisy pump, and it will probably be louder than you would like for street use. I decided to address these issues ahead of time with the in tank pump/16 gallon tank and large muffler. more pictures from different angles. 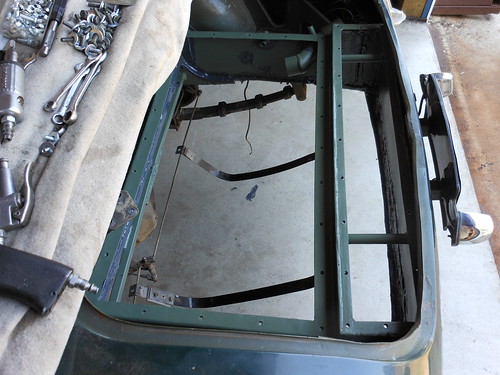 rear enclosure - painted and sealed 2 by Kevin Frank, on Flickr rear enclosure - painted and sealed 2 by Kevin Frank, on Flickr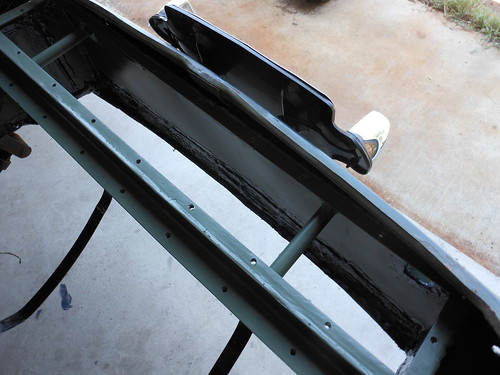 rear enclosure - painted and sealed 3 by Kevin Frank, on Flickr rear enclosure - painted and sealed 3 by Kevin Frank, on Flickr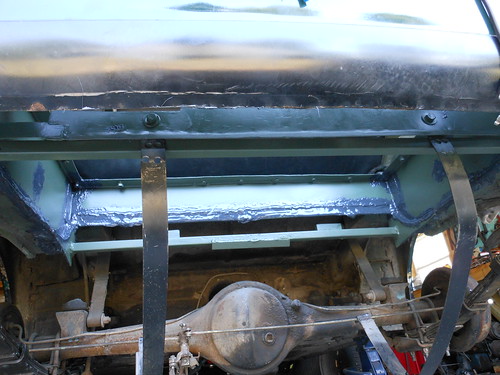 rear enclosure - painted and sealed 4 by Kevin Frank, on Flickr rear enclosure - painted and sealed 4 by Kevin Frank, on Flickrand a picture of the vents exiting the original holes for the back up lights. 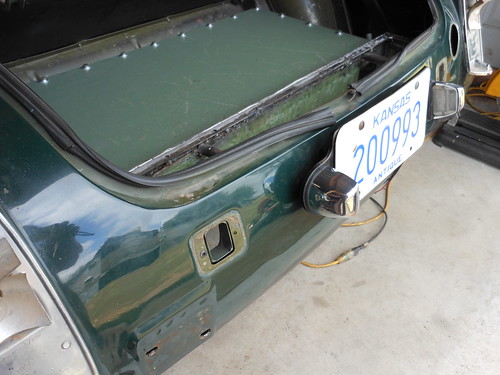 rear enclosure - muffler 4 - vents by Kevin Frank, on Flickr rear enclosure - muffler 4 - vents by Kevin Frank, on FlickrThey still need to be sealed to the body with some caulking and covered with wire mesh and finished off with bezels. I plan to build a rear bumper later and incorporate the back up lights into that.
__________________
1988 N/A SE 2+2, dead stock and staying that way. 1979 SA22C stock? Not so much. http://rotarycarclub.com/rotary_foru...ad.php?t=15585 Last edited by GySgtFrank; 08-08-2015 at 04:08 PM. |
|
|
|
08-10-2015, 02:24 PM
|
#132 |
|
Professional Stick Poker
Join Date: Feb 2011
Location: Stafford, Ks.
Posts: 1,018
Rep Power: 16 |
Tank installed and everything hooked up except the fuel lines. The muffler is just hanging in there for fitment. Now that I have the final area for hanging the muffler I can get back to building the exhaust. One thing always seems to need done before you can get to what you were originally trying to do in the first place. Waiting on some more mandrel bends to continue that.
 rear enclosure - done 1 by Kevin Frank, on Flickr rear enclosure - done 1 by Kevin Frank, on Flickr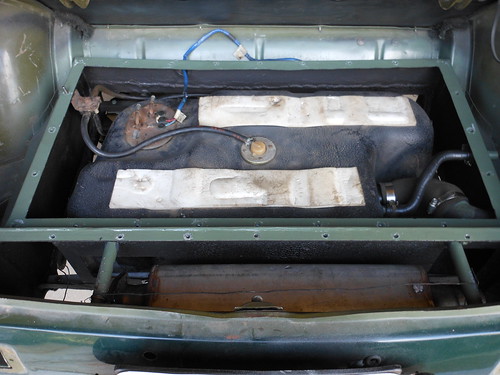 rear enclosure - done 2 by Kevin Frank, on Flickr rear enclosure - done 2 by Kevin Frank, on Flickr rear enclosure - done 3 by Kevin Frank, on Flickr rear enclosure - done 3 by Kevin Frank, on Flickr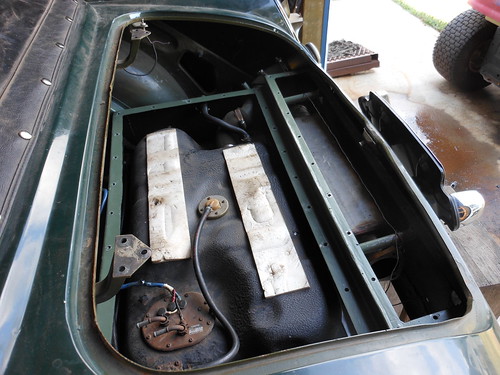 rear enclosure - done 4 by Kevin Frank, on Flickr rear enclosure - done 4 by Kevin Frank, on Flickr rear enclosure - done 5 by Kevin Frank, on Flickr rear enclosure - done 5 by Kevin Frank, on Flickr
__________________
1988 N/A SE 2+2, dead stock and staying that way. 1979 SA22C stock? Not so much. http://rotarycarclub.com/rotary_foru...ad.php?t=15585 |
|
|
|
08-10-2015, 02:28 PM
|
#133 |
|
Professional Stick Poker
Join Date: Feb 2011
Location: Stafford, Ks.
Posts: 1,018
Rep Power: 16 |
... and pictures of it buttoned up.
 rear enclosure - done 6 by Kevin Frank, on Flickr rear enclosure - done 6 by Kevin Frank, on Flickr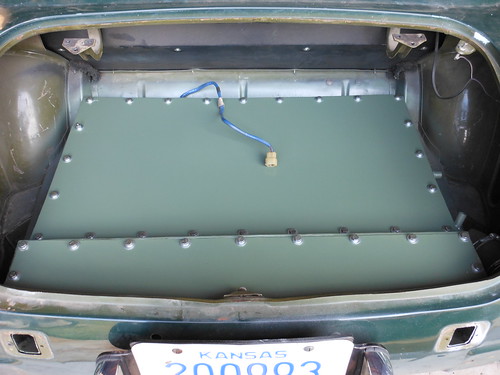 rear enclosure - done 7 by Kevin Frank, on Flickr rear enclosure - done 7 by Kevin Frank, on FlickrLots of bolts, but they're needed to clamp the gasket material tightly between the lids and the body of the enclosure.
__________________
1988 N/A SE 2+2, dead stock and staying that way. 1979 SA22C stock? Not so much. http://rotarycarclub.com/rotary_foru...ad.php?t=15585 |
|
|
|
08-10-2015, 02:38 PM
|
#134 | ||
|
Rotary Fanatic

Join Date: Mar 2008
Location: Rockville MD
Posts: 456
Rep Power: 18 |
Coming together nicely Kevin, well done.
__________________
93 Frozen Grey Metallic FD Build thread here 17 Camaro SS 1LE 04 RX-8 GT Quote:
Quote:
|
||
|
|
|
08-10-2015, 02:52 PM
|
#135 |
|
Professional Stick Poker
Join Date: Feb 2011
Location: Stafford, Ks.
Posts: 1,018
Rep Power: 16 |
Thanks Mike. This part took a lot longer than I figured it would, but it should work.
__________________
1988 N/A SE 2+2, dead stock and staying that way. 1979 SA22C stock? Not so much. http://rotarycarclub.com/rotary_foru...ad.php?t=15585 |
|
|
 |
| Bookmarks |
|
|


 Linear Mode

